
Google will force the transition to HTTPS for July 2018
By marking sites not using SSL certificate with the mention “Not secure” if a form contained confidential data this last September, Google sent a clear message that the unsecured web was destined to disappear. With the soon to be released version 68 of Chrome, Chrome’s security product manager Emily Schechter recently announced that the measure would go further.
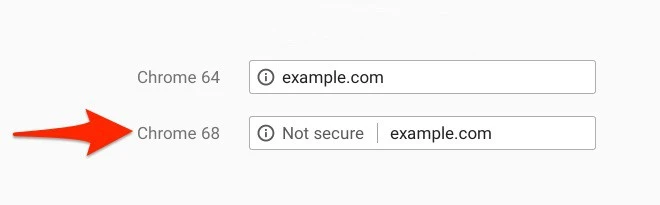
Scheduled for July 2018, version 68 of the famous Google Chrome browser will mark any site not using the HTTPS protocol as “Not secure”. The following image shows what the address bar will look like for your site next July:
How to convert my site from HTTP to HTTPS?
There are many ways to get there depending on the technology you use.
First, no matter the technology, you will need an SSL certificate. You need an SSL certificate to be able to encrypt data that is transferred between your web server and visitors. To get one, you can :
- Buy an SSL certificate from NameCheap then ask your host to install it for you.
- Buy an SSL certificate from your host directly.
- Get a certificate from Let’s encrypt which offers SSL certificates for free (some limitations exist and not all web hosts support this technology).
How to make sure your SSL certificate is properly installed
Once your certificate is installed, you will need to make sure that all the “resource files” (CSS, JavaScripts, images and other media files) used on all pages of your site are called with an HTTPS link. This will ensure that your page is secured. Simply adding an SSL certificate to your website is not enough. You would create what’s called a “Mixed Content Warning”, which means that some resources have not been loaded safely. When this happens, your page will be considered unsafe and marked as “Not secure” by Chrome (and other browsers).
3 methods to setup your SSL certificate correctly
1. Use a plugin that allows you to change links to force HTTPS to your resource files automatically at each page load.
This solution is simple to execute but is a temporary solution as it does not modify the database and performs string replacements over and over again. This means that each time a page is loaded, the conversion must be done again. This operation slows down the site and may eventually cause conflicts. We do not recommend this approach.
2. Change all links to your resource files manually in the database.
You may use different scripts to achieve this. This way of doing things is more tedious but does not create any future dependencies and only needs to be done once. After you’ve completed the changes in the database, you can configure WordPress to use exclusively the HTTPS protocol and voila! We must admit that these manipulations require technical knowledge and may not be easy. Make sure to perform a backup before doing the conversion. This is the technique we recommend and use for our customers.
3. When in doubt, ask a professional
The last option is to trust professionals like us with our conversion service to HTTPS. We will take care of everything for you.
Conclusion
Google wants to end the “less secure web” by forcing websites to use the HTTPS protocol. We recommend that you start planning your conversion now. That way, your visitors won’t get a bad impression when Chrome version 68 is released!